Let’s face it – Lightroom is a two faced beast. Like the Roman god Janus, Lightroom presents photographers with two distinctly different faces. On the one side, Lightroom contains some amazing functionality. For a wedding photographer, Lightroom contains 90-95% of what you would want for photo editing and digital asset management. I would even argue Lightroom has too much functionality (book module…anyone, anyone?). On the other side lies Lightroom’s problem. Ever since Lightroom 3, application performance has deteriorate. Import, culling, sorting, editing and exporting have all become dog slow functions. So, professional photographers live with a two-sided compromise – love the functionality, hate the performance. If you love Lightroom’s functionality, but crave more speed, then read on.
My setup
Before I jump into a bunch of suggestions for changing things around, let me first familiarize you with my setup. I am going to use my setup as an example to help illustrate my points. I’ll be the first to admit that my brand new 2013 Mac Pro is not representative of most users. That’s OK, it’s only being used for an example, and not for benchmarking. In fact, you’ll find no benchmarks here (more on that in a moment).
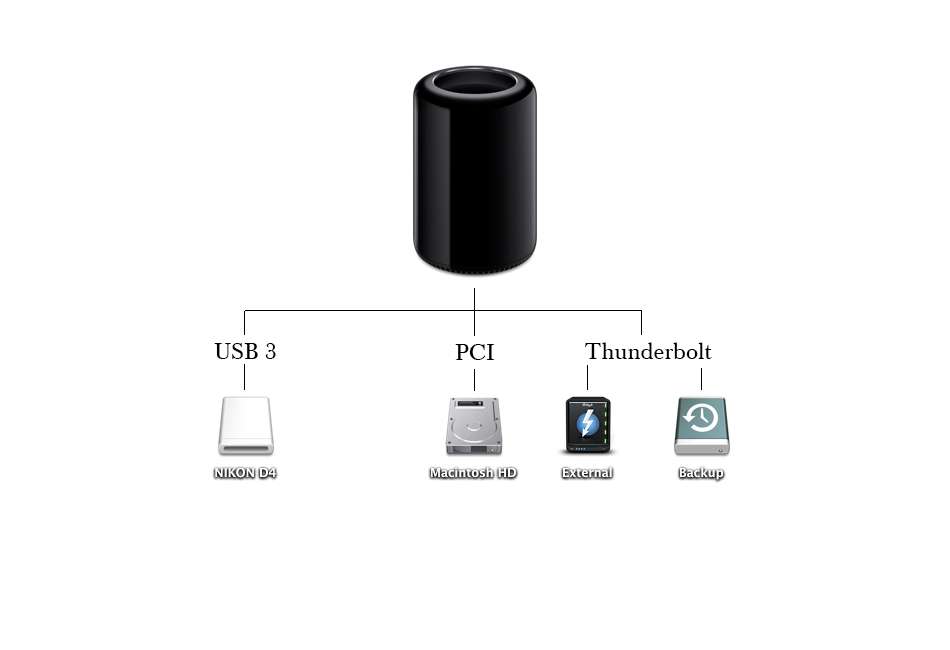 What’s important to note about my system is the various disc types and how they’re connected to the computer. Nikon D4 is a memory card reader simply connected by USB3. Nearly all photographers would import photos in this manner. Macintosh HD is a PCI-connected SSD drive. By far, this is the fastest drive on the system (nearly 1,000 MB/s), but it’s also the smallest and most costly. External is a huge Drobo 5D storage array connected via Thunderbolt. The Thunderbolt connection is fast and the Drobo is the largest disc. Backup is also connected via Thunderbolt. It’s not the largest or the fastest, but it’s just for backup.
Location, location, location
Correctly choosing where to store Lightroom data can have a large impact on speed. Through lot’s of reading and some extensive testing, I’ve arrived at a solution that works well for me, and should work well for most. I’m not including benchmarks because everyone has different systems and discs, so a benchmark just wouldn’t make any comparative sense. Instead, I’ll explain the theory below. But first, recommendations for where to store what –
- Lightroom catalog – the fastest disc you have, ideally an SSD drive. The disc should also use your fastest interconnect. PCI, SATA and Thunderbolt would be ideal. USB2 and Firewire would not.
- Lightroom cache folder – same as above – put it on your fastest disc.
- Main photo archive – A large disc with a reasonably fast connection. Because most of us have terabytes of photos, cost trumps speed for this disc.
- Backup – A large, cheap disc. Need not be terribly fast, as long as it doesn’t cause your backup jobs to lag.
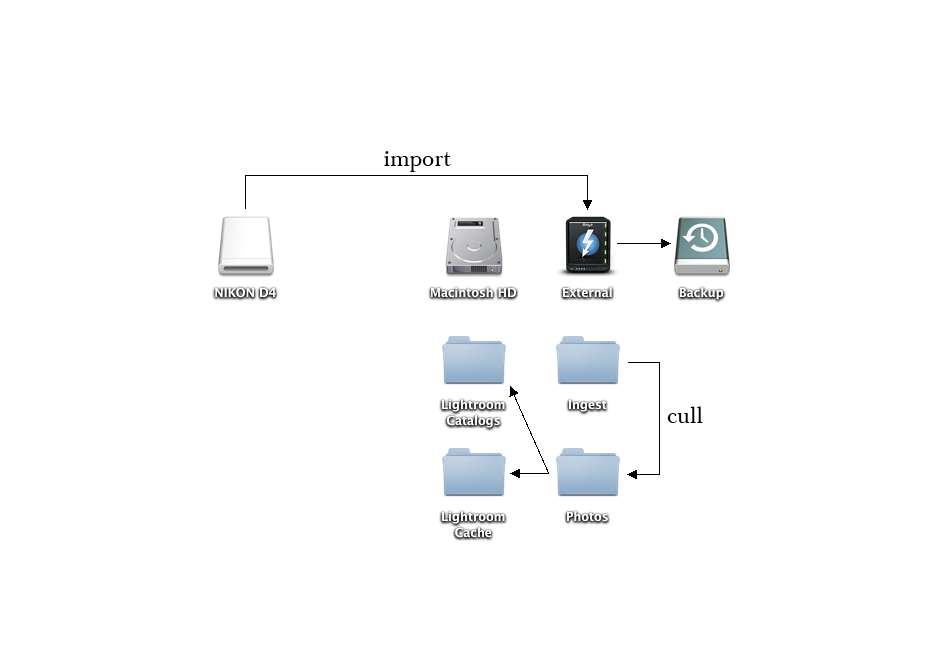 As you can see above, I import via a USB3 card reader directly to the “Ingest” folder on the External drive. After I cull the photos to identify the selects, I import them via Lightroom 5, which moves the selects to the main Photos folder. This also loads up the Lightroom Catalog and Lightroom Cache with info on the new photos. Because my Macintosh HD drive is the fastest, my Lightroom catalogs and cache files live there. Quick side note – I do not cull in Lightroom. No matter the setup, I find it way too slow due to the idiotic insistence on pre-rendering RAW files. Instead, I use Photo Mechanic by CameraBits (more on that in a future post).
Why this works
Interestingly, Lightroom is really “chatty” with catalogs and cache, but not so much with the native RAW files. When editing photos, sorting or adjusting metadata, Lightroom “talks” most to the catalog and cache files. Also, it does so in small chunks of data. It rarely references the native files at all. This means that the most accessed data (catalog and cache) should live on the fastest disc. Because the native photos files aren’t accessed much, they have the freedom to live anywhere. Sure, you could also put them on your fastest disc. However, if you managing an archive as large as mine, that could get really expensive.
Technical tidbits
So what’s happening under the covers? Imagine a hard drive is a popular grocery store on a Sunday just after church let’s out. It’s a busy time with many shoppers buying lots of things. Upfront are the registers with lots of people waiting in line. Just like the grocery store, your hard disk has a line, or queue. When not much is happening, the queue is essentially zero. However, when lot’s of data is being written, the queue can get rather long. Even worse, when lot’s of people are buying just one or two items, the lines are insane. Just like the grocery store, writing lots of little data bits to a disk can really slow things down. As you work, Lightroom needs to write lots of little updates to the catalog and cache. Therefore, the queue can get long and performance suffers. To combat this, we simply use faster and faster disks. Hence, raw disc speed and the speed of the connection is important – primarily for the catalog/cache disk.
For Windows users, you can monitor the disk queue by opening the Task Manager, then select the Performance tab and lastly click on Resource Monitor (admin privileges required). Look for “queue depth” under the disk section. Queue depths of 0-1 is essentially idle. Depths of 2-5 are busy. Anything more is swamped.
Bonus performance tips
Want some other ideas to speed up Lightroom and your photo editing. Try the ideas below. I’ll be explaining these in detail in a future post –
- Increase the Lightroom cache size under Preferences
- Import photos using “Copy as DNG”
- Learn the keyboard shortcuts and stay off the mouse
- When exporting, divide the batch by the number of processor cores and run one export per core
That’s all for today. Happy “wed-iting.”


